Animate the controls
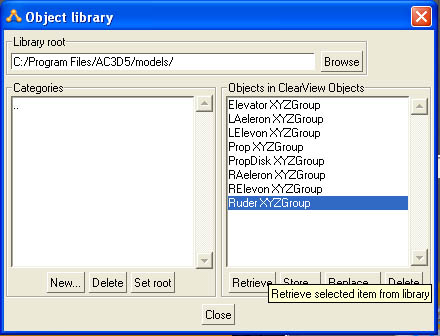
We will start by animating the rudder because it is the simplest in this model to start with. Ensure that nothing is selected and then display the object library, (File->Object Library). Change categories to display the ClearView Objects that you created earlier.
Select the Ruder XYZGroup and click Retrieve. The 'orth' windows will now change to display the XYZGroup.
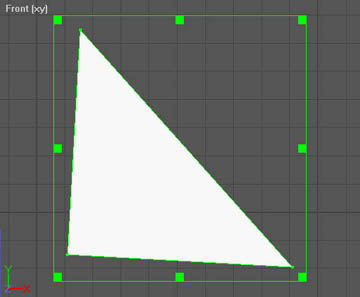
At this point you will notice that the group isn't quite vertical in the front window. As this is the hinge line it will need to be corrected.
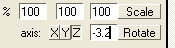
To correct this tilt ensure that AC3D is in 'Group' mode and then rotate the group -3.2° around the Z-axis. This straightens up the group.
It is a good idea to store this modified version back into your library for next time so assuming you still have the library displayed click 'Replace'. It will prompt you that the object already exists and confirm that you really want to replace it. Click 'Yes' to replace it. You can now dismiss the library.
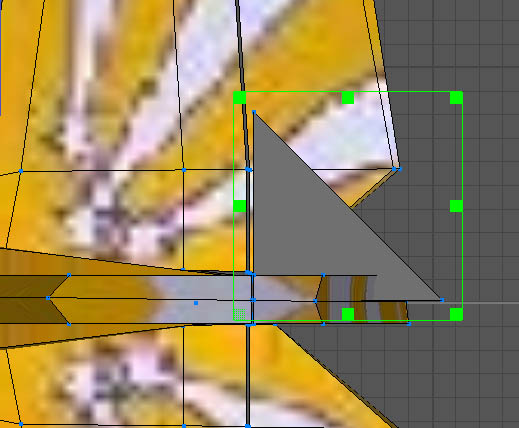
Ensure that you are in group mode and then drag the XYZGroup until it is in line with the hinge line of the rudder. In this case I am choosing to hinge the rudder along its centre line.
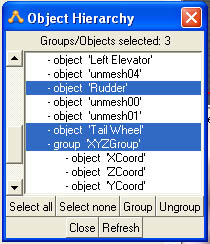
Now using the object hierarchy window, also select the object 'Tail Wheel' and the object 'Rudder'. Then select 'Group' either from the edit menu or by pressing the 'Group' button on the object hierarchy window. This will create a single group called 'group'. This should now be renamed 'Ruder'.
The rudder control now consists of the rudder itself, the tail wheel and an XYZGroup that tells ClearView how to move things in response to a control. If you save the model now you would be able to load it into ClearView and observe the rudder, and tail wheel, responding to rudder control.
Now we can basically replicate these same actions for the elevator and the ailerons. However, there is a slight twist to the elevator. Often the elevator hinge line is at right angles to the centre line of the body. In the case of this model the elevator hinge lines are swept forward.
With right angled hinge lines it would be possible to use a single Elevator XYZGroup to indicate the hinge line and then just associated both elevator halves with it in a similar way to how we associated the rudder and tail wheel. If we were to do this for this model then one of the elevator halves would move in a very strange way when viewed with ClearView. This is one case where we use two Elevator XYZGroups, one for each elevator half.
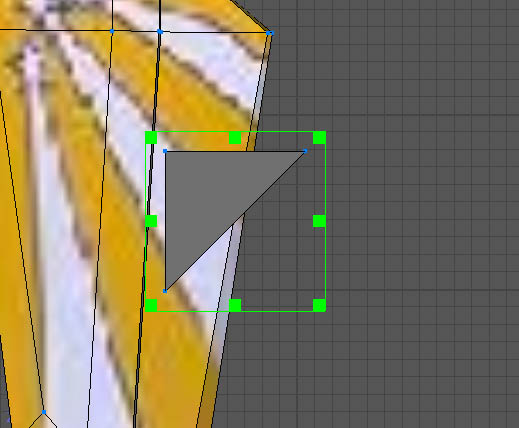
Starting with the left elevator drag the XYZGroup until it is over the left elevator. You may need to raise it above the elevator to see the whole of the triangle.
As you can see the group is not quite aligned with the elevator hinge line. To do this the group should be rotated 3.5° around the Y-axis.
It can then be dragged to the hinge line and moved down through the elevator until it rests in your desired hinge line, top, middle or bottom hinged.
Once in the correct position, again using the object hierarchy window, also select the left elevator and then group them together. Call the group ‘Elevator’. Repeat the same actions for the right elevator only this time it will need to be rotated -3.5° around the Y-axis. Group it with the right elevator and call the resultant group ‘Elevator1’. Save the model as you now have working elevators and rudder.
To complete the ailerons you complete basically the same actions. This time the LAeleron XYZGroup needs to be rotated -2° around the X-axis and when combined with the left aileron called ‘LAeleron’. Perhaps not surprisingly the RAeleron XYZGroup is rotated 2° around the X-axis and when combined with the right aileron should be called ‘RAeleron’.
Again at this stage save the model as you now have the Decathlon with fully moveable flying surfaces. All that remains is to animate the prop.